Once your event is created and published, and your AplosPay merchant account is set up, you will be ready to collect registrations and payments.
Note: If you have not set up your AplosPay merchant account, see the guide for creating your AplosPay account.
Sharing Your Registration Form
When your registration form is published, you can share the link to your event page by email, social media, or from your website to collect registrations.
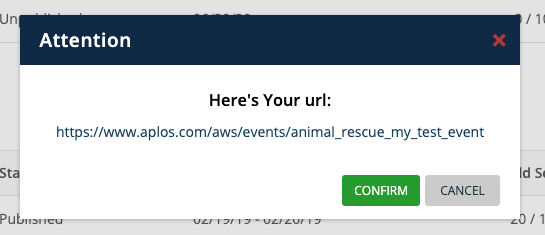
To find your form webpage link:
- go to the Events page
- Select the three dots under the Actions column for your event.
- Select “Get URL”
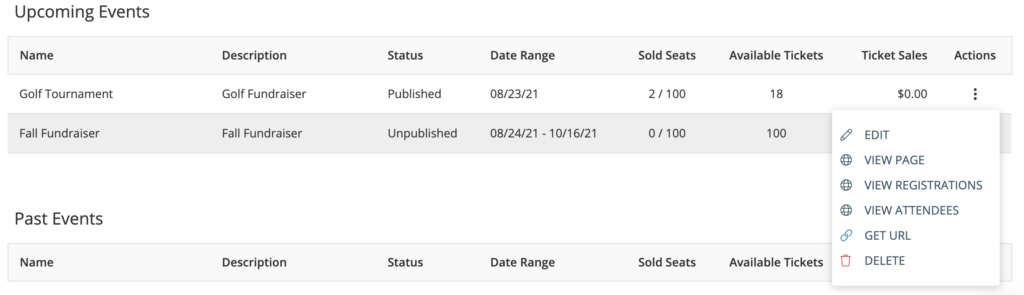
- Click the URL link - a new tab in your browser will open so you can copy the URL.
Selecting Tickets And Quantity
When registrants visit the form, they will:
- choose how many tickets of each type they would like to purchase.
- The section for Your Order at the bottom of the form will reflect the quantity and amount due.
If the registrant is not seeing any tickets available to choose from, check the following on your event form editing:
-
-
Event Details - Ensure the current day and time is in between the registration open and close date and time that was set
-
Ticket Details - Ensure the current day and time is in between the ticket start and end date and time that was set
-
Event Details - Ensure the current day and time is in between the registration open and close date and time that was set
Registrant And Attendee Information
Next, the registrant will provide their contact information and details for each ticket purchased. As soon as they reach this page, they will see an alert at the top letting them know their tickets have been reserved and a 10-minute timer will begin.
As the timer gets close to the 10-minute mark, a pop-up will appear allowing the registrant to have more time to to complete the registration if needed.
If they do not complete their registration within the 10-minute time limit and do not request more time, the tickets will be released so they become available to anyone else registering for the event.
Entering Payment Information
Then, registrants will see a review of their purchase and provide their payment information. Payment options that were chosen during the event form set up will show here, including:
- making a deposit (advanced event reg. required)
- paying later
- paying transaction fees
- adding a donation
If a cancellation policy was entered, this will also show under the purchase review:
Event Registrant Email Receipt
When their checkout is complete, the registrant will receive an email confirmation receipt. The event email receipt template can be branded by the organization. It will include the event name and a review of their purchase. If the event is virtual, it will also include the login details for virtual access as provided in the Link and Description of the event.
If you have Advanced Events enabled, you can customize the email receipt by doing the following:
- navigate to the Marketing -> Emails -> Automatic Emails
- Selecting the email titled “Event Registration Receipt.”
- If you are an administrator on your account, you can enable Advanced Events on your subscription page.
- All text at the top of these emails is required and cannot be edited. However, you can add text and images below.
- If you are an administrator on your account, you can enable Advanced Events on your subscription page.
- Click “Start a new section.”
- Enter the desired text, images, button, line, or space.
- Once you’re done editing, click “Save & Exit.”
All registrants from that point on will receive the updated event registration receipt email.
Related to