After a visitor completes their registration, their contact information and payment information will be stored in the event, where you can view ticket sales, registrations, and attendees. From the event, you can also manage your registrants and your attendees. If a registrant purchased multiple tickets for additional guests, you can view the additional guests under the Attendees List.
View And Export Registrations
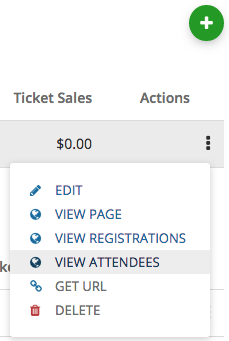
- Manage ticket information from the Event screen by selecting the three dots under the Actions column and clicking “View Registrations.”
- The registration table includes:
- Registrant’s name, email, and order number.
- Registration date, payment status, total amount, amount paid, and balance due.
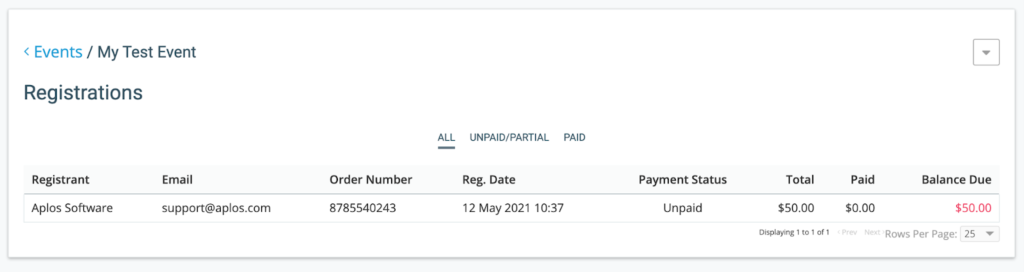
- The table only displays details for the person who completed the registration, not all attendees.
- Use filter tabs to view:
- All registrants
- Unpaid/Partial registrations
- Paid registrations
- Use "Status" dropdown to view active vs. cancelled registrations
- Export the registrant list to Excel for check-in or balance collection by clicking the arrow at the top right and selecting “Export.”
View Registration And Payment Details
- Click on a registrant’s name in the event’s registration report to open a sidebar with:
- Registration details
- Payment details
- Tickets: Number and type of tickets purchased
- Payment History: Payments and donations received
- Select “View All Attendees” in the sidebar to see a full list of attendees linked to the registration.
Collecting Balances For Unpaid Registrations
If you have registrants who chose to pay their registration later, you can send them an email to complete their unpaid registration online, or retroactively show that they paid you another way. This can be done in the side bar of the individuals registration details.
Online Payments
If a registrant has an outstanding balance, you have two options on how they can pay online:
-
“Send Payment Link" Button: clicking this button will prompt an automatic email to be sent to the registrants email they signed up with
- you can edit this automatic email from the automatic emails screen
-
Payment Link URL Copy: Copy and manually send the payment link if preferred. This option may be used if:
- you would like to create your own email with the link
- the email address it needs to be sent to is different than the one connected to the registration
Once the registrant completes their payment, the payment status will update automatically.
Offline Payments
To collect payments via cash or check:
- Select the registrant with a balance due and click “Cash/Check Payment.”
- Enter the following payment details:
- Date – Required
- Reference – Optional, auto-filled with order number (up to 500 characters)
- Bank Account – Required, choose from enabled asset register accounts
- Note – Optional, up to 1,000 characters
- Click "Pay"
This will submit a payment as a contribution deposit and will appear in the selected bank account register.
*The income account is selected based on the purpose that was chosen when creating the paid ticket.*
Cancelling Registrations
You can cancel registrations in the Registrant Detail View. Click the gear icon on the right side and select “Cancel Registration.” This will remove the registrant from the active registration list and open the tickets for availability. You cannot undo any cancellations as this process is final.
This action will not initiate a refund for any paid tickets. To refund the amount of the ticket, you must process the refund separately through your Stripe account, if desired. See this article for more information.
View And Export Event Attendees
Registrants may provide the names of one or more people who will utilize the tickets for an event. Those people are referred to as attendees. You can view a complete list of anyone who has been assigned a ticket for an event by doing the following:
- Go to the Events screen
- Click the three dots under the Actions column
- Select “View Attendees”
The Attendee Report includes:
- Names of assigned ticket holders
- Attendee-provided information (if you would like to see any additional custom fields that were added, export the attendees list)
- Ticket types
Attendee details are not automatically added to the Aplos contact database.
To export the attendee list to Excel for easy in-person check-in, select the arrow on the top right and click “Export.”
Creating A Smart List Of Event Registrants
You can build a Smart List of event registrants using List Builder to easily send an email, letter, or text message (Bulk Texting is required). To create a list, visit Lists in the People section and select the green plus (+) icon and choose “New Smart List.” Click on “Attended Event” from the dropdown and select the event name. Save your list to export it, print mailing labels, or use it in your communications. For more information on how to create a Smart List and how to utilize the Smart List actions, view our resource on creating a Smart List.
Related to