From the Events module, you can create a registration form for your event and add tickets that will be available for people to purchase. Create your event and start collecting registrations.
To begin:
- Navigate to the Donations tab -> Fundraising > Events.
- Select the green plus (+) icon from the top right of the Events screen.
On the left side of this screen is where you will be doing all of your editing by toggling between the four tabs available: Details, Branding, Tickets, and Payment. On the right side you will be able to see a preview of your form as you make your edits along the way
Set Event Details
The first step to creating your event will be to set the event name and description. Once you have done this, you are ready to fill out the details of your event including: date, time, location, available seats, and cancellation policy.
-
Event Name: the URL of the form, appears on the receipt of purchase sent to the registrant, and used for attendee Smart Lists.
- please note: your event name becomes a part of your form URL you share after it is saved for the first time so be sure to change to a desired name BEFORE saving for the first time.
-
Event Description: Internal only, not shown on the registration form.
-
Timezone: Defaults to the event form creator's timezone but can be changed via the dropdown.
-
you can also edit your user timezone in your Aplos profile
-
you can also edit your user timezone in your Aplos profile
-
Start & End Date/Time: Specifies the event duration. Defaults to when the event is created but should be updated accordingly.
-
Registration Open & Close Date/Time: Determines when people can access the form and purchase tickets.
-
Location: A location is required for your event. Under Location Type, select Physical Location or Virtual Location.
-
Physical Location: Select an existing location or select “Add as New Location” in the location field to create a new one.
-
Virtual Location: Enter a URL link and a description for attendees.
- Registrants who have signed up will receive a confirmation email with the link and description from this section.
- Registrants who have signed up will receive a confirmation email with the link and description from this section.
-
Physical Location: Select an existing location or select “Add as New Location” in the location field to create a new one.
-
Number of Seats: Set the maximum number of individuals who can attend your event.
- If a ticket includes multiple seats, list the total number of seats, not tickets.
- If a ticket includes multiple seats, list the total number of seats, not tickets.
-
Cancellation Policy: Enter text as a disclaimer, outlining how cancellations will be handled within your organization.
- This will NOT enforce any specific action from the Aplos system if someone requests to cancel or the event is cancelled.
-
Policy will show on the checkout screen for registrants
Branding Your Event
Branding is available to customize the look and feel of your form. You can add an image, headline, and description of your event. Each of these fields will be viewable to registrants who access your form.
-
Add an Image: Upload an image (ideal size 600×250 pixels) or choose from the library.
- If your image is pixelated or stretched, you will need to resize the image and upload it again.
- The image will be placed on your event form and saved in your library if you uploaded it.
- click “Upload” or “Library”
- select the image you want to use
- confirm selection
-
Headline & Description:
- Headline: Acts as an attention grabber as it is the title of the live form
- Description: Provides event details for registrants.
-
Social Media: Add URLs to your organization’s social media pages.
Creating Tickets
There are two ticket types: a paid ticket that costs a set amount and a free ticket that costs nothing.
Standard Event Registration allows you to select a single ticket type for each event registration form. You can upgrade to Advanced Event Registration to create multiple tickets at different prices by selecting “Upgrade Now.”
To start, determine your ticket type. If it is a free ticket, click the pencil icon under “Actions” to create your ticket. If it is a paid ticket, click the red trash can icon to delete the test ticket and select “Add Ticket.”
Set Up Free Ticket Details
- Ticket Name & Description: these will be visible to registrants
-
Ticket Quantity:
- Available Tickets: how many tickets of that type are available for purchase
- Seats Included Per Ticket: how many individuals can gain entry per ticket
- scenario 1 ex.: you’re creating an event for a golf fundraiser, and you want to sell a ticket for a foursome, you might have 50 tickets available to sell, but each ticket purchased is for a group of four. In this case, your quantity will be 50, but your seat count will be four
- scenario 2 ex.: you’d like one ticket to allow entry for one person, you will enter the number of tickets available in the availability field, and the seat count will be one
- Display Remaining: shows the number of available tickets on the live form.
-
Collect Information Per Seat: allows you to collect information about each attendee.
- This option is used for tickets with more than one seat.
-
Start & End Sale Dates: the period of time people are able to register for these tickets.
Set Attendee Info
Next, you can add fields to your form for your registrants to complete for attendees. The available data you can collect includes: First & Last name, Email, Phone, and Address. If you need to collect additional fields that are not available you can upgrade to Advanced Event Registration to create Custom Event Fields. For more information on how to upgrade check out our Advanced Event Resource.
-
Add Attendees As Contacts: checkmark this option to create contacts for any additional attendees.
-
When the option to create contacts from the attendees is checked, the fields First Name and Last Name are required.
-
When the option to create contacts from the attendees is checked, the fields First Name and Last Name are required.
- Required box: decide whether or not to make the custom fields a requirement before checking out
-
Actions column: if you would like to remove a field, click the trash can icon under the actions column
When registering we attempt to prevent duplicate contact creating by following these rules:
- If the registrant information matches an attendee, only one contact is created
- If multiple attendees have the same first name and last name but no email, multiple contacts are created
- If multiple attendees have the same first name, last name, and emails then only one contact is created.
Set Up Paid Tickets Details
To sell tickets, you must create an AplosPay account first. If you have not done that yet, check out our AplosPay Setup Guide.
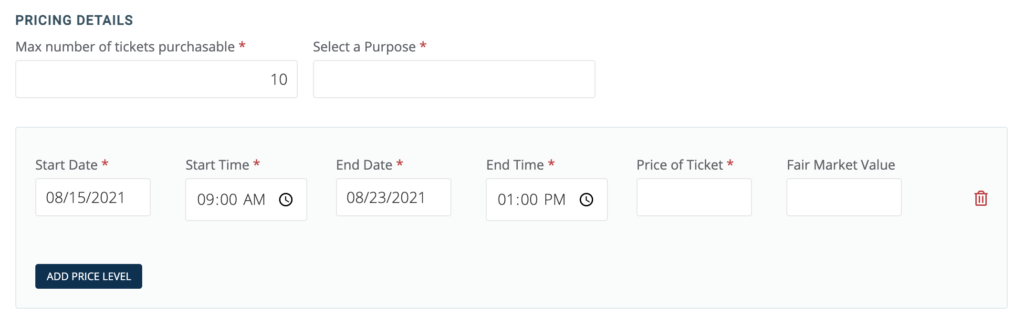
For paid tickets, you have the same options as free tickets, but you will also have additional fields for Purchase Limit and Select a Purpose; and ticket details, such as: Start Date and Start Time, End Date and End Time, Price of Ticket, and Fair Market Value.
- Max Number of Tickets Purchasable: Limits how many tickets a single person can buy.
-
Select A Purpose: used to track any ticket sales as contributions.
-
When a ticket is sold, the funds are automatically tracked in Aplos based on the selected purpose. To learn more about purposes and how to create them, check out our resource on purposes in Aplos.
-
Fair Market Value: Defines the non-deductible portion of ticket sales.
- ex.: you have a ticket price of $75, but you’re providing a meal to the attendee, and your cost for that meal is $25, then the remaining $50 of the registration would be considered a donation from the attendee and would be included on their contribution statement
-
Early Bird Pricing: select "add price level" to add automatic pricing changes for discounted rates
- you cannot have multiple price levels for the same timeframe
- the form will only show the first ticket price if they are all set for the same day and time.
-
When a ticket is sold, the funds are automatically tracked in Aplos based on the selected purpose. To learn more about purposes and how to create them, check out our resource on purposes in Aplos.
Receiving Payments
You’ll have the option to set up different payment options for people who are registering for your event. You can allow ACH (bank withdrawals) or credit card/debit card payments.
-
Paying Transaction Fee Option: If registrants pay online, there is an option to allow them to cover the cost of their transaction fees.
-
Complete Without Payment: You will also have the option to allow registrants to pay later by check or cash. People who select this option will show a balance due on the registration report until the balance is paid. You can also send an email to collect their payment online.
-
Add Donation: Invite registrants to donate during their checkout. To enable this feature, Click “Add donation” and select the purpose for the donation.
-
Note: Added donations will be a separate payment transaction from the event registration payment. The donor will also receive a separate email and receipt.
-
Pay A Deposit: If you have Advanced Events enabled in your subscription, you can allow registrants to pay a deposit during their checkout.
- Select a percentage of the registration or a fixed amount.
- You will be able to view payment information and track any outstanding balances when managing your registrants.
-
Note: Added donations will be a separate payment transaction from the event registration payment. The donor will also receive a separate email and receipt.
Publishing And Sharing Events
When your event is ready, you can preview it, publish it, save it, or exit. Locate the four options to the right of the event editor page and select your preferred choice. Each selection is described below.
- Preview: Previewing allows you to see the last saved version of your form.
- Publish: Clicking “Publish” will update your form and make it available to the public on a webpage.
- Save: Clicking “Save” will save your work without updating your published form.
- Exit: Exiting will leave your form without saving changes.
Once published, you will only see the tickets that are available to purchase based on the dates you have selected. If you have a ticket option that is only available for a certain period of time, and that time has lapsed or hasn’t arrived yet, then that ticket option will not show on the registration form.
If you need to unpublish your form for any reason, you will have that option if your form was published. This will make the form URL inactive. To unpublish your form:
- navigate to the Events page in Aplos, locate the preferred event, and select it.
- Locate the “Unpublish.” button on the right side of your screen
- Click “Unpublish” and the event will automatically be unpublished and saved.
Related to