Recurring transactions can be scheduled to automatically post regularly occurring transactions to your Check Register or Accounts Payable/Receivable based on a specified date. This guide will walk through setting up and managing both types of recurring transactions.
To start, navigate to Fund Accounting -> Transactions -> Recurring Transactions.
*Please note: this feature requires the CORE subscription of Aplos*
Creating A Recurring Register Transaction
Step 1: Create new recurring transaction
To create a new recurring transaction that will be posted to a register:
- Ensure that you are on the Recurring Register Transactions tab
- Click the green plus (+) icon on the top right corner of the page.
Step 2: Add transaction details
This will take you to the screen shown below, where you’ll be able to set the schedule, select which register the transaction should be posted to, and enter the details of the transaction.
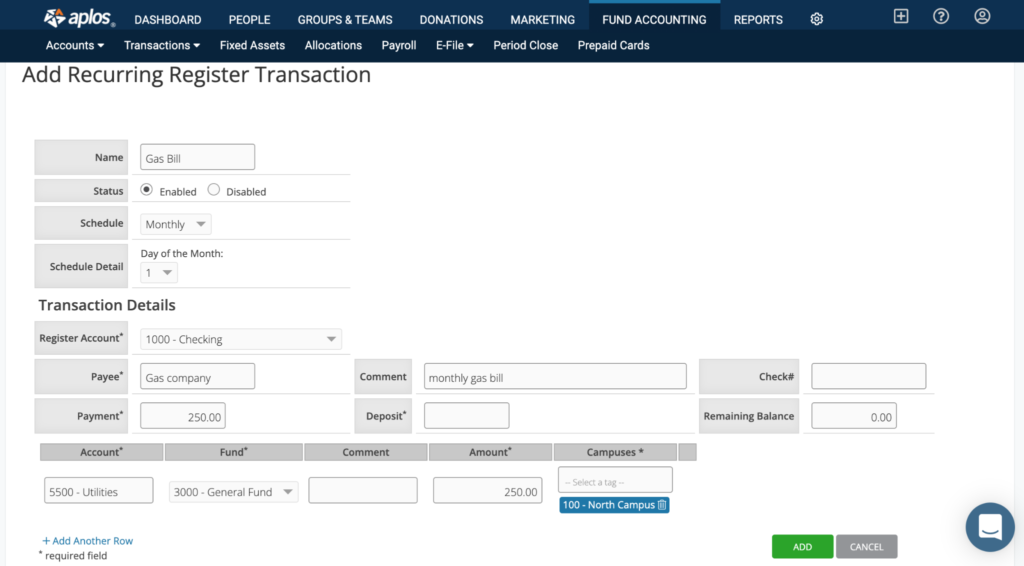
- Name: The name of your bill.
- Status: This is where you can Enable or Disable your recurring transaction.
- Schedule: Here you can schedule your transaction to post Weekly, Monthly, Quarterly, or Annually.
- Schedule Detail: Here you can select on what specific day your transaction will post.
- Transaction Details: This is where you will input the Payee, amount, and account details.
Step 3: Add transaction
Once you’ve entered all of the details, you’ll click “Add” to complete the setup. You’ll then see this transaction and any other scheduled recurring transactions listed on the Recurring Transactions page. This will automatically post to your accounting on the scheduled date.
Creating A Recurring Accounts Payable / Receivable Transaction
If you have bills that you receive on a consistent basis or invoices that you receive payments from, you can also create a recurring payable or receivable from the Recurring Transactions screen.
Step 1: Create new recurring transaction
To do this:
- Ensure that you are on the correct tab
- Payables for bills and Receivables for invoices
- Click the green plus (+) icon on the top right corner of the page.
Step 2: Add transaction details
- Provide a name
- Set the schedule
- Select which account the transaction should be posted to
- Enter the details like you would from the Accounts Payable/Receivable screen
- Name: The name of your bill/invoice.
- Status: This is where you can Enable or Disable your recurring transaction.
- Schedule: Here you can schedule your transaction to post Weekly, Monthly, Quarterly, or Annually.
- Schedule Detail: Here you can select on what specific day your transaction will post.
- Transaction Details: This is where you will input the Payee, amount, and account details.
Step 3: Add transaction
Once you’ve entered all of the details, you’ll click “Add” to complete the setup. You’ll then see this transaction and any other scheduled recurring payables listed on the Recurring Transactions page.
- When the payable is processed, you will be able to locate the transaction in the Pay Bills section under Accounts Payable.
- When the receivable is processed, you will be able to locate the transaction in the Receive Payments section under Accounts Receivable.
How to Edit Or Delete A Recurring Transaction
You can click on the name of a recurring transaction to make any necessary edits. Including changing the status of the transaction to disable it. This will pause the recurring transaction and it will no longer continue to post.
You can also delete the transaction altogether. Deleting a recurring transaction cannot be undone and will be permanent.
Be sure to click “Update” when you’re done to save the changes.
For information on how to enter other types of transactions, check out the article on recording and reconciling transactions.
Related to